
TL;DR
Turning a closet into a usable recording space hinges on understanding soundproofing versus dampening. Proper mic placement, sealing gaps, and strategic treatment make all the difference. A closet can become a quiet, effective studio with smart planning.
Ever tried recording in a tiny closet? It can be a game-changer — or a sound disaster. The secret isn’t just slapping up foam panels; it’s knowing what to treat and where. You’re about to learn how to craft a closet into a quiet, usable space—whether for voice, music, or AI workstations.
This isn’t about spending a fortune on foam or fancy drywall. It’s about smart placement, sealing leaks, and understanding the difference between dampening echoes and blocking sound leaks. Get these right, and your closet becomes a professional-sounding booth—no matter how tight or cheap the space.
Acoustic dampening
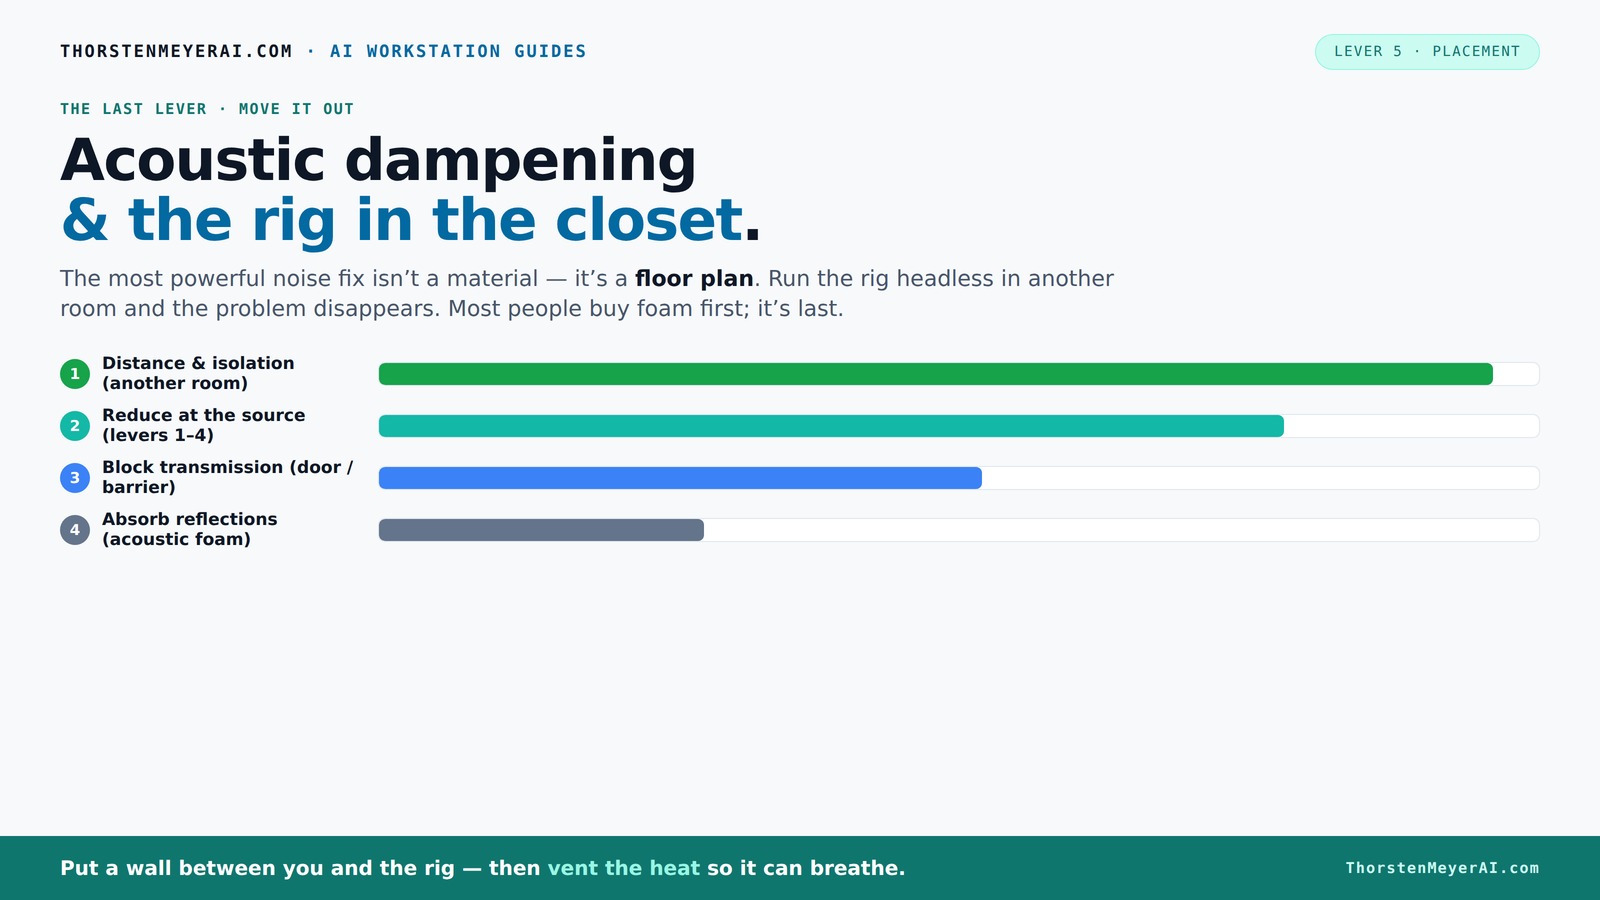
& the rig in the closet.
The most powerful noise fix isn’t a material — it’s a floor plan. A rig you can’t hear because it’s in another room beats any amount of foam. Tap the approaches in Part 1 to see what actually works.
(another room)
(levers 1–4)
(door / barrier)
(acoustic foam)
Contain the noise, not the heat
Key Takeaways
- Sealing gaps and treating reflection points are more effective than just adding foam.
- Mic placement and facing away from reflective surfaces improves recording clarity.
- Ventilation is critical—don’t seal a closet completely without airflow solutions.
- Bass buildup in tiny closets requires corner traps or upper-corner treatment.
- A closet can become a quiet, functional studio if you balance acoustic treatment with airflow and practical setup.

Focusound 52 Pack Acoustic Foam Panels 1" x 12" x 12" Sound Proof Foam Panles Soundproofing Noise Cancelling Wedge Panels for Home Office Recoding Studio with 300PCS Double-Side Adhesive
Soundproofing - Acoustic foam panels triangular grooves structure for better noise absorption, helps to reduce and absorb unwanted...
As an affiliate, we earn on qualifying purchases.
As an affiliate, we earn on qualifying purchases.
Dampening vs. Soundproofing: Know the Difference to Get It Right
Acoustic dampening and soundproofing are worlds apart, but most beginners confuse them. Dampening, or absorption, reduces echo and reflections inside the space. Think of it as softening the sound inside your closet, making it less 'boxy.' Soundproofing, on the other hand, blocks sound from escaping or entering through walls, doors, or gaps.
For example, hanging foam panels inside your closet is dampening. Sealing the door gaps with weatherstripping is soundproofing. You want both in a perfect setup, but they serve different purposes. According to [1], combining these techniques makes a huge difference—just don’t rely on foam alone to keep sound out.
Understanding this distinction is crucial because it influences your material choices and placement strategies. Overemphasizing dampening without addressing leaks can still lead to noise escape, while focusing solely on soundproofing might neglect the room’s internal echo, making recordings sound dull or muddy. Balancing both ensures a cleaner, more professional sound.

8 Pack - Bass Traps Acoustic Foam Corner, 8''x8''x12'' Black Bass Traps Corner Studio Foam, High Density and Fire-Proof Acoustic Panels Recording Studio Acoustical Treatments
Acoustic Principle- Bass Trap is a kind of sound absorbing structure specially used to absorb specific low-frequency standing...
As an affiliate, we earn on qualifying purchases.
As an affiliate, we earn on qualifying purchases.
Best Mic Placement in a Closet: Capture Clear Sound Without Deadness
The first step in any closet vocal booth is mic placement. Position your mic where it picks up your voice directly and minimizes reflections. Usually, this means placing the mic about 6-12 inches away, pointing towards your mouth, and avoiding flat surfaces behind it.
Imagine recording in a closet; the wall behind your head is a prime reflection point. Treat it with foam or a blanket. You’ll get cleaner recordings and less echo. According to [4], mic placement influences where you should add absorption—treat the reflection points first, then fine-tune.
Deeply considering mic placement matters because it directly impacts the clarity and quality of your recordings. Placing the mic too close can cause proximity effect, making your voice sound boomy, while placing it too far can pick up unwanted room noise. Positioning it correctly reduces the need for excessive treatment, saving you money and space. Additionally, understanding the room’s reflection points helps you target your acoustic treatment precisely, avoiding unnecessary clutter and optimizing sound quality.

Audimute Soundproofing Acoustic Door Seal Kit - Door Sweep and Seal - (Large Size)
Includes (2) Door Seals (3/16" x 1/2" x 50') and (1) Door Sweep (1/2" x 1.5" x 25').
As an affiliate, we earn on qualifying purchases.
As an affiliate, we earn on qualifying purchases.
Where to Put Acoustic Panels and How to Seal Gaps Properly
Place acoustic panels at the primary reflection points—typically the wall behind the mic, side walls, and ceiling. Use a mirror trick: sit in front of the mic, have a friend move a mirror along the wall. When you see the reflection of the mic in the mirror, that’s where a panel should go.
Gaps around doors, wiring holes, and vents are sound leaks. Sealing these with weatherstripping or acoustic sealant is essential. Seal these with weatherstripping or acoustic sealant. A hollow closet door is a major weak point; hanging a dense blanket or installing a solid door can help with both sound and reflections. For sealing tips, check out [1] and [3].
Addressing reflection points and leaks is vital because untreated surfaces and gaps allow sound waves to bounce and leak. Reflection points create comb-filtering and muddiness, while gaps let external noise in and your sound out. Proper placement of panels ensures that internal echoes are minimized, resulting in clearer recordings. Sealing gaps prevents sound from leaking, which is especially important if you need a quiet environment or are trying to prevent sound bleed into adjacent rooms. The combination of strategic placement and sealing transforms a noisy, reflective space into a controlled acoustic environment.

Professional Studio Recording Microphone Isolation Shield, Pop Filter,High density absorbent foam is used to filter vocal. Suitable for Blue Yeti and other condenser microphones (AO-504 With Stand)
♪【The package contains】♪: Microphone Isolation Shield x 1, Metal Thread Adapter x 2 (Adapt most microphones), Adjustable Stand...
As an affiliate, we earn on qualifying purchases.
As an affiliate, we earn on qualifying purchases.
Foam, Blankets, and Panels: What Each One Actually Does
Not all treatments are equal. Learn more about acoustic treatment options. Foam panels are great for reducing echoes and flutter echoes inside the space. Blankets and rugs absorb reflections too, but are less effective at blocking sound leakage. Panels are usually 2-4 inches thick, with thicker options targeting lower frequencies.
For a closet, a combination works best: install foam panels on the walls and ceiling, hang blankets over the door, and lay a rug on the floor. This mix keeps the room from sounding 'dead' while still reducing echo. According to [4], thicker panels are better for bass issues, especially in larger closets.
Understanding the differences between these materials is critical because each serves a specific purpose. Foam panels are excellent for internal reflection control but offer limited soundproofing. Blankets and rugs help with absorption but do little to prevent sound from escaping. Choosing the right combination depends on your priorities—whether you want to improve internal acoustics, block external noise, or both. Thicker panels and dense materials will generally provide better low-frequency control, which is important in small, confined spaces where bass buildup can cause muddiness and lack of clarity.
How to Handle Bass Buildup and Standing Waves in Small Spaces
Small closets often trap low frequencies, creating bass 'boom' and standing waves. For solutions, see bass trapping techniques. This results in uneven sound and muddiness. To fix it, focus on corner traps and upper corners—these are prime spots for bass buildup.
For example, installing bass traps in the upper corners can reduce low-end issues by 20-30%. If you notice your recordings sound boomy or hollow, consider adding these traps or adjusting your treatment placement. [4] explains that even a few small traps can make a big difference in tiny rooms.
Deeply understanding bass issues is important because low-frequency energy doesn’t behave like higher frequencies; it tends to accumulate in corners and along parallel surfaces, causing uneven sound and muddiness. Check out practical bass trapping advice. If left unaddressed, this can make recordings sound unnatural and fatiguing. Using bass traps strategically in corners helps absorb these frequencies before they bounce around, smoothing out the sound. Recognizing the tradeoff, however, is that adding too many bass traps can make the space overly dead or alter the room’s natural tone. The goal is to find a balance that reduces muddiness without sacrificing liveliness.
Ventilation and Practical Setup Tips for Closet Studios
Ventilation is the tricky part. You can’t just seal the closet door and expect good airflow. A passive vent or a quiet exhaust fan is essential. Think of it like a small HVAC system—hot air needs a way out, especially if running high-power gear.
For example, a simple duct with a quiet fan can keep your rig cool and prevent heat buildup. Without proper airflow, your hardware throttles and fans scream. Check out [2] and [3] for ideas on affordable, DIY solutions that keep your closet both quiet and cool.
Proper ventilation isn’t just about comfort; it’s about maintaining the longevity and performance of your equipment. Overheating can cause hardware to throttle, reducing performance and potentially damaging components. Additionally, inadequate airflow can lead to increased noise from your gear’s cooling fans, defeating the purpose of your soundproofing efforts. Incorporating a vent with a quiet fan or a small duct system ensures a continuous exchange of air, preventing heat buildup while keeping noise levels low. The tradeoff involves balancing soundproofing with airflow—careful placement of vents and choosing low-noise fans is key to a successful setup.
Turn Your Closet into a Quiet, Practical Workspace That Works
With smart placement and treatment, your closet can become a surprisingly effective studio. Focus first on sealing leaks, then treat reflection points, and manage low-frequency issues. Remember, a door with gaps leaks sound—and a small space can develop bass problems fast.
And if noise isn’t a concern? Just put your rig in a closet on the other side of the house. Use a wired connection, ventilate properly, and you’re golden. It’s the easiest way to keep your workspace quiet and your gear cool.
Transforming a closet into a working studio requires strategic planning. Prioritize sealing gaps and leaks to prevent sound escape. Next, treat reflection points to improve clarity. Finally, address low-frequency buildup to avoid muddiness. This holistic approach ensures your space isn’t just quiet but also acoustically balanced. Remember, even small adjustments—like adding a door seal or a bass trap—can significantly enhance your recording environment. The key is understanding the tradeoffs and focusing on the most impactful treatments first, gradually upgrading as needed.
Frequently Asked Questions
What’s the biggest mistake people make when turning a closet into a studio?
Many just add foam panels without sealing gaps or managing low-frequency issues. That leaves sound leaks and bass problems unaddressed, ruining the quality of recordings and letting noise escape.Do I really need bass traps in such a small space?
If your recordings sound boomy or uneven, yes. Small closets often develop low-end buildup because of parallel walls. Corner traps or foam bass traps in upper corners can help smooth out the sound.How can I prevent my closet from overheating when I put high-power gear in it?
Install a quiet exhaust fan or create a small vent with ducting. Proper airflow keeps your hardware cool and prevents heat buildup, which could throttle performance or cause damage.Can I just put blankets over the door instead of sealing gaps?
Blankets help absorb reflections and reduce sound leaks but aren’t a replacement for sealing gaps. For serious soundproofing, weatherstripping and acoustic sealant are more effective.How much does it cost to turn a closet into a decent studio?
You can do it for under $200 if you use DIY solutions like blankets, foam panels, and weatherstripping. More advanced setups with bass traps and ventilation can cost $500 or more, especially if you buy professional gear.Conclusion
The real secret to a successful closet studio isn’t just about stuffing foam everywhere. It’s about smart placement, sealing leaks, and ensuring airflow. When you get these right, your tiny space can produce professional-quality recordings and quiet AI rigs without breaking the bank.
So, next time you see a closet, don’t dismiss it as a sound trap. Think of it as a blank canvas—ready to be transformed into a sleek, silent workspace that suits your needs perfectly. The key is knowing what to treat and where to place it.